Tuesday, April 29, 2008

TWD: Fluted Polenta and Ricotta Cake

I guess I was more adventurous than others this week, and actually gave the really weird sounding recipe a try. With advice for other TWD Bakers, I reduced the amount of sugar, and it was definitely still sweet enough. It was very similar to a cornbread, and very, very yummy. I personally don't care for the way the butter looked on top after baking, and I'd omit the butter altogether if I make this again. Overall, another winner! (and I am tired, so letting the pictures do the talkin'!)


Fluted Polenta and Ricotta Cake
Source: Baking: From My Home to Yours, by Dorie Greenspan
Chosen by Caitlin of Engineer Baker

About 16 moist, plump dried Mission or Kadota figs, stemmed (I used dates)
1 c. medium-grain polenta or yellow cornmeal
½ c. all-purpose flour
1 tsp baking powder
1 c. ricotta
1/3 c. tepid water
¾ c. sugar
¾ c. honey (if you’re a real honey lover, use a full-flavored honey such as chestnut, pine, or buckwheat)
Grated zest of 1 lemon
2 large eggs

Getting Ready: Center a rack in the oven and preheat the oven to 325 degrees F. Butter a 10 ½-inch fluted tart pan with a removable bottom and put it on a baking sheet lined with parchment or a silicone mat. (I used a 9" springform pan and made a mini tester tart in a 4 inch tart pan)

Check that the figs are, indeed, moist and plump. If they are the least bit hard, toss them into a small pan of boiling water and steep for a minute, then drain and pat dry. If the figs are large (bigger than a bite), snip them in half.

Whisk the polenta, flour, baking powder, and salt together.

Working with a stand mixer fitted with the whisk attachment or with a hand mixer in a large bowl, beat the ricotta and water together on low speed until very smooth. With the mixer at medium speed, add the sugar, honey, and lemon zest and beat until light. Beat in the melted butter, then add the eggs one at a time, beating until the mixture is smooth. Reduce the mixer speed to low and add the dry ingredients, mixing only until they are fully incorporated. You’ll have a sleek, smooth, pourable batter.

Pour about one third of the batter into the pan and scatter over the figs. Pour in the rest of the batter, smooth the top with a rubber spatula, if necessary, and dot the batter evenly with the chilled bits of butter.

Bake for 35 to 40 minutes, or until a thin knife inserted into the center of the cake comes out clean. The cake should be honey brown and pulling away just a little from the sides of the panm, and the butter will have left light-colored circles in the top. Transfer the cake to a rack and remove the sides of the pan after about 5 minutes. Cool to warm, or cool completely.


Sunday, April 27, 2008

Tasty Tools: Peanut Butter and Banana Nutella Muffins


My husband loves bananas. But for the past few months, I've brought them home green (because he likes them way before the first appearance of a brown spot) and they have hung on our lovely banana holder until they are almost covered in brown spots. As a result, I have about 8 bananas in the freezer right now. This morning I had SEVEN dark brown bananas, and refused to put all of them in the freezer.

So I went off in search of a recipe that could use the most bananas at one time. My google reader had a number of offerings, but they only used 2 bananas, as most, and I wouldn't have enough of the other ingredients to double the recipe. I came across a recipe from Giada for Banana Muffins that used 4 bananas for 18 muffins, and decided to run with it. I knew I wanted to add a few things, switch a few things, and subtract a few things... so off I went. Then came a stroke of genius... as I went to the pantry to grab the peanut butter, I saw....


the jar of nutella! Screw the mini chocolate chips that I had in mind - these muffins were getting a heart of nutella! With this addition, I think these muffins really push that fine line between a muffin and a cupcake. Maybe they are mupcakes?

As I got going, I also realized these would be perfect for April's Tasty Tools Event, which highlights scoops of all kinds. I used a mini ice cream scoop (no idea what the technical term is) to deliver two heaping scoops of batter per muffin, surrounding a heart of nutella. These come together so easily, which is an added bonus!
These were sooooo delicious, but a teensy bit drier than I'd like. That probably has to do with the extra 1/2 cup of dry ingredients I added. Below I have tweaked the recipe to use less flour so it won't be quite as dry. But seriously - YUM - what a nice treat!

Peanut Butter and Banana Nutella Muffins
Yield: 23.5 muffins (had I not been lazy, I'd have picked a bit from the others to make it a whole 24)

~1.5 cups all-purpose flour
~1 cup whole wheat flour
~1 teaspoon baking soda
~1 teaspoon salt
~1/2 teaspoon baking powder
~1/2 teaspoon ground cinnamon
~1/2 teaspoon ground nutmeg
~1/4 cup wheat germ
~1/4 cup ground flax seed
~3/4 cup sugar
~1/2 cup sour cream
~1/2 cup unsweetened applesauce
~1/2 cup chunky peanut butter
~3 large eggs
~1 tablespoon vanilla extract
~4 ripe bananas, peeled and coarsely mashed
~Nutella, about 6 Tbsp, enough for 3/4 tsp per muffin

1. Line 18 muffin cups with paper liners, or spray with baking spray such as Baker's Joy. Preheat the oven to 325 degrees F.

2. Whisk the flour, baking soda, salt, baking powder, cinnamon, nutmeg, wheat germ and ground flax seed in a medium bowl to blend. Beat the sugar, applesauce, sour cream, eggs, vanilla, and peanut butter in a large bowl to blend. Stir in the banana. Add the dry ingredients and stir just until blended.

3. Fill the bottom of each muffin cup with one heaping scoop of batter and spread with the back of the scoop to cover the bottom. Drop about 3/4 tsp of nutella onto the center of each cup. Follow with another heaping scoop of batter, making sure to surround the heart of nutella with batter. Bake the muffins on the middle rack until the tops are golden brown and a tester inserted into the center comes out with no crumbs attached (but maybe a little streak of nutella!), about 20-25 minutes. Transfer the muffins to a rack and cool slightly. The muffins are great warm, but if they are saved for later, a few seconds in the microwave should bring back the the warm gooey heart.

Nutritional Information (...ready?): Calories - 176; Total Fat - 6.1 g; Sat. Fat - 1.7 g; Cholesterol - 30 mg; Sodium - 158 mg; Carbohydrates -27g; Fiber - 2g; Sugar - 10 g; Protein - 4.6 g.


First... a layer of batter


Second... a heart of nutella


Then... a second layer of batter


Fresh out of the oven, with nicely risen tops


mmmmmmmmmmmmmm!


Product Review: Bamboo Handled Kabob Grill Basket

I picked up these grill baskets from Bed, Bath & Beyond because I hate dealing with skewers (especially for vegetables). I saw these back when I was registering for our wedding, and finally got around to purchasing them ($9.99 for a set of 4, but always use your coupons for 20% off!). We have used them twice this weekend and LOVE them! I have found that they fit the equivalent of about one boneless/skinless chicken breast each. They are so easy... just open the cage, plop in your meat or vegetables, lock the cage and toss on the grill. I keep the bamboo handle outside of the grill, so when it's time to flip, the handle is cool and makes it very easy. When the cooking is done, just unlock the cage and empty onto a plate. E-A-S-Y! Clean up is... not as easy, but they are for the grill, so I'm just letting them... "season"


Thursday, April 24, 2008

Caramel Brownies - Revisited

IMG_0016cc 
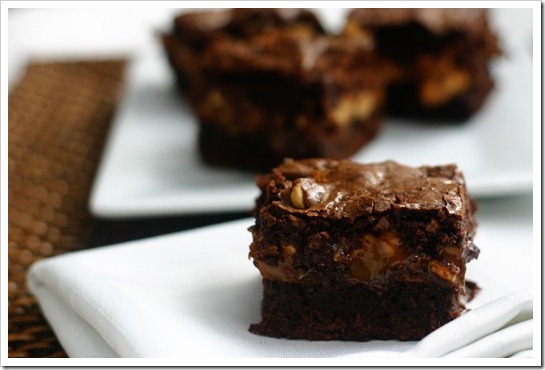
So a while ago I featured Caramel Butterscotch Brownies - which have turned out to be my hubby's favorite dessert. I tried once to use a homemade brownie recipe, but it didn't really pan out so I went back to the cake mix. Last week I received my very own copy of Baking Illustrated and came across their Chewy, Fudgy Triple-Chocolate Brownies. I instantly knew I'd have a winner with this recipe! These are TO DIE FOR! It's the perfect brownie recipe for this!

IMG_0019cc

Chewy, Fudgy Triple-Chocolate Brownies
Chewy, Fudgy Triple-Chocolate Brownies Source: Adapted from Baking Illustrated, from the Editors of Cook's Illustrated
Yield: 16-25 brownies

 
Ingredients
  • 5 ounces semisweet or bittersweet chocolate, chopped
  • 2 ounces unsweetened chocolate, chopped (recommended: Hershey's)
  • 8 tablespoons unsalted butter (1 stick) cut into quarters
  • 3 tablespoons cocoa powder
  • 3 large eggs
  • 1 1/4 cups (8 3/4 ounces) sugar
  • 2 teaspoons vanilla extract
  • 1/2 teaspoon salt
  • 1 cup (5 ounces) all-purpose flour
  • 1/3 cup evaporated milk
  • 35 (10-oz. pkg.) caramels, unwrapped
  • 2 cups (11-oz. package) butterscotch morsels
Instructions
  1. Adjust oven rack to lower-middle position and heat oven to 350 degrees. Line an 8-inch square baking pan with parchment paper.
  2. In medium heatproof bowl set over a pan of almost-simmering water, melt chocolates and butter, stirring occasionally until mixture is smooth. Whisk in cocoa until smooth. Set aside to cool slightly.
  3. Whisk together eggs, sugar, vanilla, and salt in medium bowl until combined, about 15 seconds. Whisk warm chocolate mixture into egg mixture; then stir in flour with wooden spoon until just combined. Spread half of batter baking pan, spread into corners, and level surface with rubber spatula; bake about 15 minutes.
  4. Meanwhile, heat caramels and evaporated milk in small saucepan over low heat, stirring constantly, until caramels are melted. Sprinkle morsels over brownie; drizzle with caramel mixture. Drop remaining batter by heaping teaspoon over caramel mixture. Spread as gingerly as possible to connect as much of the top layer of brownie as you can. It will cook up a little and heal itself if you get it most of the way there. (Don't worry about picking up a little of the caramel.) Bake for 25 to 30 minutes or until toothpick inserted in center comes out with a small amount of sticky crumbs (or caramel!) clinging to it. Cool in pan on wire rack to room temperature. Cut into 16-25 squares, depending on how big you want'em!

Tuesday, April 22, 2008

TWD: Bill's Big Carrot Cake


I love carrot cake. LOVE it. I remember my mom used to make it for my birthday (unless I requested ice cream cake). She must have make it from a box all those years, because finally, one year she made it from scratch and OH did I hear about it! She would NEVER grate that many carrots AGAIN.

I decided I wasn't up for grating carrots either, so I chopped them up a bit and threw them in this reeeaaaally mini food processor attachment that came with my immersion blender. I had 'grated' carrot in seconds.

I debated leaving out the raisins in this, because I don't really think they have a place in carrot cake, but ultimately I decided that I should give the whole recipe a chance, at least once! I used golden raisins (that I still had leftover from the apple-pie cake) so my cake didn't have random dark specs in it. Also, frosting it didn't go quite as planned. Dorie's fabulous photo shows a bare-sided cake, with a thick, luscious heap of frosting between each layer of cake. I was afraid of not having enough frosting (and apparently too lazy to measure) so when the second layer was plopped down, I realized I'd skimped to much. By the time I was done, I had enough left to frost the sides, so I did, but it wasn't quite thick enough.. blah blah blah, I stuck some coconut on there and called it a day.

Overall, this is one FABULOUS carrot cake - incredibly moist and SO tasty. Next time I probably will omit those raisins, and maybe give the pecans a try. I used walnuts this time and would love to see what pecans bring to the table.

Oh, and check out my review of Wilton's Bake Even Strips... I used them on these layers and they came out perfect!


Bill's Big Carrot Cake
Baking: From My Home to Yours, by Dorie Greenspan
Chosen by Amanda of slow like honey
See more TWD bakers here!

Yields 10 servings

Ingredients:

For the cake:
2 cups all purpose flour
2 teaspoons baking powder
2 teaspoons baking soda
2 teaspoons ground cinnamon
¾ teaspoon salt
3 cups grated carrots (about 9 carrots, you can grate them in food processor fitted w/ a shredding a blade or use a box grater)
1 cup coarsely chopped walnuts or pecans
1 cup shredded coconut (sweetened or unsweetened)
½ cup moist, plump raisins (dark or golden) or dried cranberries
2 cups sugar
1 cup canola oil
4 large eggs

For the frosting:
8 ounces cream cheese, room temperature
1 stick ( 8 tablespoons) unsalted butter, at room temperature
1 pound or 3 and ¾ cups confectioners' sugar, sifted
1 tablespoon fresh lemon juice or ½ teaspoon pure lemon extract
½ cup shredded coconut (optional)
Finely chopped toasted nuts and/or toasted shredded coconut (optional)

Getting ready:
Position the racks to divide the oven into thirds and preheat the oven to 325 degrees Fahrenheit. Butter three 9-x-2-inch round cake pans, flour the insides, and tap out the excess. Put the two pans on one baking sheet and one on another.

To make the cake:
Whisk the flour, baking powder, baking soda, cinnamon and salt. In another bowl, stir together the carrots, chopped nuts, coconut, and raisins.
Working with a stand mixer, preferably fitted with a paddle attachment, or with a hand mixer in a large bowl, beat the sugar and oil together on a medium speed until smooth. Add the eggs one by one and continue to beat until the batter is even smoother. Reduce the speed to low and add the flour mixture, mixing only until the dry ingredients disappear. Gently mix the chunky ingredients. Divide the batter among the baking pans.
Bake for 40-50 minutes, rotating the pans from top to bottom and front to back at the midway point, until a thin knife inserted into the centers comes out clean. The cakes will have just started to come away from the sides of the pans. Transfer the cakes to cooling racks and cool for about 5 minutes, then run a knife around the sides of the cakes and unmold them. Invert and cool to room temperature right side up.
The cakes can be wrapped airtight and kept at room temperature overnight or frozen for up to 2 months.

To make the frosting:
Working with a stand mixer, preferably fitted with a paddle attachment or with a hand mixer in a large bowl, beat the cream cheese and butter together until smooth and creamy. Gradually add the sugar and continue to beat until the frosting is velvety smooth. Beat in the lemon juice or extract.
If you'd like coconut in the filling, scoop about half of the frosting and stir the coconut into this position.

To assemble the cake:
Put one layer top side up on a cardboard cake round or a cake plate protected by strips of wax or parchment paper. If you added the coconut to the frosting, use half of the coconut frosting to generously cover the first layer (or generously cover with plain frosting). Use an offset spatula or a spoon to smooth the frosting all the way to the edges of the layer. Top with the second layer, this time placing the cake stop side down, and frost with the remainder of the coconut frosting or plain frosting. Top with the last layer, right side up, and frost the top- and the sides- of the cake. Finish the top with swirls of frosting. If you want to top the cake with toasted nuts or coconut, sprinkle them on now while the frosting is soft.
Refrigerate the cake for 30 minutes, just to set the frosting before serving.

Serving:
This cake can be served as soon as the frosting is set. It can also wait, at room temperature and covered with a cake keeper overnight. The cake is best served in thick slices at room temperature and while it's good plain, it's even better with vanilla ice cream or some lemon curd.

Storing:
The cake will keep at room temperature for 2 to 3 days. It can also be frozen. Freeze it uncovered, then when it's firm, wrap airtight and freeze for up to 2 months. Defrost, still wrapped, overnight in the refrigerator.

Sunday, April 20, 2008

Product Review: SideSwipe Blade

My trusty Kitchen Aid beater was starting to chip after too many runs in the dishwasher (which, apparently I am not supposed to put it in). In the market for a new beater, I had heard about the SideSwipe beater and just decided to get it!

The first thing I noticed was the big set of instructions. There are a few restrictions to using the Sideswipe blade, such as: no peanut butter, no chunky ingredients like chips, only for use on low speed. The little blue fingers are firm with a little give to them, and definitely hug the bowl nicely. Cleaning can be a little tedious, getting it out of the grooves, but this is also depends on the batter... really fingers work best!

Results: Here is a video I made of the SideSwipe in action, I think it speaks for itself! I used peanut butter (oops!) and it worked just fine. Also, my mixer jostles around a bit, I think because it is not aligned properly and one side of the bowl gets hit with more pressure than the other. If tinypic is being uncooperative with the embedded video, click on the link below and you should be able to see the it.


A link for those that can't see the video

Product Review: Wilton's Bake Even Strips

I finally got around to using these Wilton's Bake Even Strips. I've had them for... probably almost a year! This week's Tuesdays with Dorie recipe, a layered carrot cake, was the perfect time to test them out.

I have the small package, which is two strips, enough for two 8 or 9 inch round pans. The strips are soaked in cold water, and excess water is squeezed out using your fingers. On my 9 inch pans, the ends just barely cross over each other, and are secured with a pin. They came out of the oven dry (and a warm to the touch), so I just let them cool and then stowed them away.

Results: I think my carrot cake layers came out great! I certainly don't feel the need to level them off. Some edges were slightly more browned than I'd like, but that may have to do with me not turning the oven down 25 degrees for my dark, nonstick pans. Overall I think they work great!