Monday, March 15, 2010

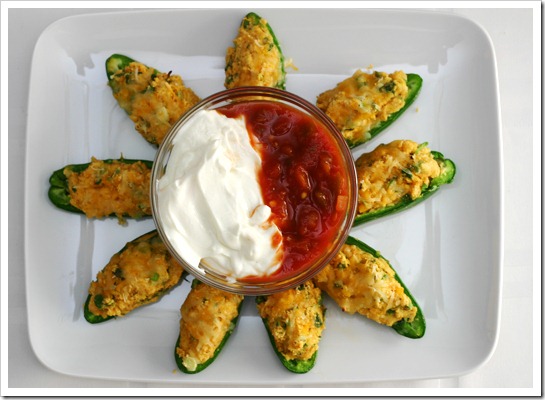
Jalapeno Poppers

Peppers, of any kind, are just not my thing. It just so happens that I married a man who grew up eating hot chili peppers off the vine. I have slowly learned to adapt my cooking so his taste buds are still happy (without killing mine in the process!). I have also challenged him to try meals that are not blazing hot, hoping he will realize that there are other flavors out there to be enjoyed! I do think I have been moderately successful in this venture. ;-)

IMG_0103c

This recipe was from the February newsletter of Clean Eating magazine (which you can sign up to receive free by e-mail through their website). Knowing I'd have no interest in them myself, I thought my husband would enjoy them and decided to give them a whirl.

IMG_0107c

Curiosity killed the cat here, and I couldn't resist trying one when he said how good they were. Much to my surprise, I thought it was really good and reached back for another one! Is there hope for me, yet?

Jalapeno Poppers
Source: Slightly adapted from Clean Eating Magazine
Yield: 40 poppers

  • 20 medium jalapeño peppers
  • 1 cup spelt flour or whole-wheat flour
  • 1 cup cornmeal, finely ground
  • 1 tsp baking powder
  • 1 tsp sea salt
  • 1 tsp chile powder
  • 1/2 tsp ground coriander
  • 3/4 cup greek yogurt)
  • 1/4 cup egg whites
  • 3 tbsp raw honey
  • 1/3 cup cilantro sprigs, chopped
  • 3 green onions, thinly sliced (about 1/3 cup)
  • 1 1/4 cup shredded low-fat cheddar cheese, divided
  • 1/3 cup greek yogurt or low-fat sour cream (optional)
  • 1/3 cup all-natural jarred salsa (optional)

INSTRUCTIONS:
1.  Preheat oven to 400°F. 

2. Cut stem end off each jalapeño and discard. Cut peppers in half lengthwise and, using a small paring knife or a teaspoon, carefully cut or scoop out seeds and discard. Place peppers cut-side-up on a parchment-lined baking sheet; set aside.

3. In a medium-size bowl, whisk together flour, cornmeal, baking powder, salt, chile powder and coriander; set aside.

4. In a separate bowl, whisk together yogurt, egg whites and honey. Add yogurt mixture, plus cilantro, green onions and 1 cup cheese to dry ingredients and mix well until just combined.

5. Spoon about 2 tsp mixture into the center of each jalapeño half. Smooth tops of mixture and place jalapeños back onto baking sheet, filling-side-up.

6. Place tray into oven and bake for 10 minutes. Remove from oven, sprinkle stuffed jalapeños with remaining 1/4 cup cheese and continue to bake for 2 more minutes or until top is golden brown and cheese is melted. Let cool at room temperature for 5 minutes before serving. Arrange on a platter and serve immediately with sour cream and salsa for dipping, if desired.

Nutrients per 2 poppers (2 stuffed jalapeño halves):
Calories: 82, Total Fat: 1.5 g, Sat. Fat: 0.5 g, Carbs: 13 g, Fiber: 2 g, Sugars: 4 g, Protein: 4 g, Sodium: 171 mg, Cholesterol: 3.5 mg

Friday, March 12, 2010

Pumpkin French Toast

Though pancakes are my favorite, I decided to change it up last Sunday and make french toast. I modified this recipe from allrecipes.com after opening the fridge and seeing some leftover pumpkin puree. This french toast is delicious, filling, and thanks to the secret ingredient - not at all soggy!

IMG_0174c

Pumpkin French Toast
Source: Adapted from allrecipes
Serves: 4

  • 1/4 cup whole wheat pastry flour (or whole wheat flour)
  • 1 cup skim milk
  • pinch salt
  • 3/4 cup eggbeaters
  • 1/2 cup pumpkin puree
  • 1 teaspoon ground cinnamon
  • 1/2 teaspoon ground ginger
  • 1 teaspoon vanilla extract
  • 1 tablespoon pure maple syrup
  • 8 slices of whole wheat bread

Add flour to a large bowl. Whisk in milk, then eggbeaters and pumpkin puree. Whisk in spices, vanilla, and maple syrup. Dip bread slices into egg wash, and place on a heated griddle or pan that has been sprayed with cooking spray. Cook until golden brown on one side, then flip until other side is golden brown. Serve with pure maple syrup.

Wednesday, March 10, 2010

Cooking Tip: Freezing Garlic

When it comes to garlic, there are usually two options. Buy fresh and grate/mince/whathaveyou as needed, or buy the jarred garlic. My husband is a huge fan of the jarred kind, but I find it less than appealing. I much prefer the taste of fresh garlic, and I love grating it on my microplane for a truly pulverized result.

IMG_0034c

But sometimes, I go to cook and discover that the garlic has been sitting in the cupboard too long and is sprouting or just plain gone bad.  I think I have finally found a solution to circumvent that problem. A friend and reader of mine recently suggested that I grate up a bunch of garlic, the press into a ziplock freezer bag and store in the freezer. When you need garlic, just break a piece off and throw it in the pan, or let it soften on the counter before using in your recipe.

I've been doing this for a few weeks (and went through the entire bag of garlic pictured below!) and it has been working out great!  The only undesirable thing I noticed with the first batch was that the garlic was very quick to turn green - a merely cosmetic problem that usually happens as a result of contact with something acidic, but can also be due to the age of the garlic.  The heads of garlic that I used definitely were not the freshest, so that could have contributed to my issue.  

IMG_0037c

Tuesday, March 9, 2010

Sesame Chicken and Noodles

I'm not quite sure where to begin, as my love for these recipes is overwhelming.  Katie first posted the sesame noodles over at Good Things Catered, and I was instantly smitten.  Then the sesame chicken appeared and the two recipes immediately went on the menu.  I knew they would be great, because a) they are from Katie, and b) hello, sesame anything is awesome!   

 
IMG_0029c

 
Little did I realize the joy that would befall me when I had the first bite of this chicken.  It was out-of-this-world-good!  There is something magical about this simple combination of ingredients, and I happily made the same chicken again the very next weekend! 
 
Sesame Chicken
Source: Slightly adapted from Good Things Catered
  • 4 boneless, skinless chicken breasts
  • 1 tsp sesame oil
  • 1 heaping Tbsp Chinese garlic chili sauce (I improvised with 1 tablespoon good quality hot sauce and 1 clove worth of grated garlic)
  • 1/2 cup whole wheat bread crumbs (Katie lists 1 cup, but I found it was way more than I needed)
  • 1/2 tsp garlic powder
  • 1/4 tsp salt
  • 1/4 tsp ground pepper
  • 1 Tbsp black sesame seeds
  • 1 tsp olive oil
Directions:
-In medium bowl, combine chicken, sesame oil and garlic chili sauce.
-Toss to combine well and place in fridge.
-Marinate chicken for at least 20 minutes and up to 2 hours.
-Remove from fridge when ready to cook and place a nonstick pan on stove over medium heat.
-Preheat oven to 350 degrees.
-Place olive oil into pan and heat until almost smoking.
-Meanwhile another shallow bowl, add bread crumbs, garlic powder, salt, pepper, sesame seeds and toss to combine.
-Using tongs, place chicken breast into bread crumb mixture and coat well.
-Place into hot pan and repeat with remaining chicken breasts.
-Cook until golden in color on one side, about 2-3 minutes and flip.
-Cook an additional 2-3 minutes and place pan into preheated oven.
-Bake until internal temperature of 160 is achieved (do not over cook) and remove, about 10-15 minutes.
-Place chicken on warm serving plate, let rest for at least 10 minutes and serve.


Sesame Noodles
Source: Slightly adapted from Good Things Catered
  • 1 (8oz) package whole wheat thin spaghetti (we use Barilla Plus)
  • 1 large carrot, ends removed and sliced into thin matchsticks
  • 1 cup snow peas, rinsed
  • 1 heaping Tbsp tahini
  • 1 Tbsp creamy natural peanut butter
  • 1/2 tsp good quality sesame oil
  • 1 Tbsp rice vinegar
  • 1 Tbsp low sodium soy sauce
  • 6 green onions, sliced thinly, dark green ends removed
  • 2 Tbsp sesame seeds
  • 1 cup reserved pasta water
 
Directions:
-Cook pasta according to package directions.
-Meanwhile, in large bowl, combine tahini, peanut butter, sesame oil, rice vinegar, soy sauce and green onions.
-Stir to combine well and set aside.
-In last 2 minutes of cooking time, add carrots and snow peas to boiling water.
-Remove 1 cup pasta water from pan and set aside.
-Drain pasta and vegetables, and place into large bowl along with other ingredients.
-Add 1/2 of reserved pasta water and toss to combine all ingredients.
-Add sesame seeds, let sit for 1 minute and add additional pasta water to obtain desired consistency
-Serve warm or cold.


Friday, March 5, 2010

Cinnamon Honey Ice Cream

Do you love cinnamon Teddy Grahams? If so, this ice cream is for you!  It tastes exactly like the cinnamon Teddy Graham snacks I remember from my childhood.  I think that's all there is to say here!

IMG_0032c

Cinnamon Honey Ice Cream

8 ounces heavy cream
14 ounces 2% milk, whole milk, or half and half (Depending on your preference)
1 cinnamon stick
1/2 teaspoon ground cinnamon
2/3 cup honey
2 egg yolks, beaten


Heat cream, milk, cinnamon stick and ground cinnamon in a saucepan over medium heat. Stir occasionally until simmering, but not boiling. Turn off heat, cover, and let steep for 30 minutes. Remove cinnamon stick and return cream mixture to heat.

Bring back to a simmer, then add honey and whisk until dissolved. Add 2 tablespoons of heated cream mixture to beaten egg yolks, whisking constantly, to temper the eggs. Repeat 3 more times, then add tempered eggs to the saucepan with the heated cream mixture.

Heat over medium heat, stirring constantly, until the mixture is thick enough to coat the back of the spoon (approximately 160 degrees F). Strain mixture, if desired. Cool thoroughly, at least 4 hours in the refrigerator, preferably overnight. Freeze according to the directions for your ice cream maker.

Wednesday, March 3, 2010

Mashed Potatoes

IMG_0005c

Another simple recipe, we also enjoyed mashed potatoes at our Christmas dinner. My favorite recipe is more of a favorite method, and it comes from the editors at Cook's Illustrated.  The focus of the method is to prevent the starch molecules from absorbing too much water and exploding, which is the cause of gluey mashed potatoes.  This method calls for steaming the potatoes, which introduces less water to them.  The result is perfectly creamy mashed potatoes (never gummy) that you can flavor however you like best.

Fluffy Mashed Potatoes
Source: Cook's Illustrated, March/April 2008
Serves 4

  • 2 pounds yukon gold potatoes (4 to 6 medium), peeled, cut into 1-inch chunks, rinsed well, and drained.
  • 4 tablespoons unsalted butter, melted (I omit when I want lighter mashed potatoes)
  • table salt
  • 2/3 cup whole milk, warm (we never have whole milk in the house, I just use skim or 2%. Having it warm is the key here)

Place a metal colander or steamer insert in a large pot or Dutch oven. Add enough water for it to barely reach the bottom of the colander. Trun heat to high and bring water to a boil. Add potatoes, cover, and reduce heat to medium high. Cook potatoes 10 minutes. Transfer colander to sink and rinse potatoes under cold water until no longer hot, 1 to 2 minutes. Return colander and potatoes to pot, cover, and continue to cook until potatoes are soft and tip of paring knife inserted into potato meets no resistance, 10 to 15 minutes longer. Pour off water from Dutch oven.

Set a ricer (preferred) or food mill over now empty pot. (I'll admit hear that I just smoosh most of the potatoes through the holes in my steamer basket and call it a day). Working in batches, transfer potatoes to hopper of ricer or food mill and process, removing any potatoes stuck to the bottom. Using a rubber spatula, stir in melted butter and 1/2 teaspoon salt until incorporated. Stir in warm milk until incorporated. Season to taste with salt and pepper; serve immediately.

Monday, March 1, 2010

Brussels Sprouts Braised in Butter

IMG_0006c

For Christmas, my (culinary idol) aunt sent me Julie & Julia along with Julia Child's Mastering the Art of French Cooking. I was eager to dive in until I realized that almost every recipe had butter. If not, it had cream. These aren't exactly clean eating approved ingredients. However, I had some brussels sprouts that I planned on preparing for Christmas dinner, so I decided to make an exception for the holiday.

Of the 7 brussels sprouts recipes in the book, I chose brussels sprouts braised in butter. It seemed easy enough, and it was! It was easy to get then started just as the turkey was finishing, and then bake them while the turkey rested and was carved. The brussels sprouts were tender and delicious!


Brussels Sprouts Braised in Butter
Source: Slightly reworded from Mastering the Art of French Cooking, by Julia Child
Serves 6

Preliminary cooking:
1-2 quarts (1 1/4 to 2 1/2 pounds) brussels sprouts, trimmed and washed
7-8 quarts water
1 1/2 tsp salt per quart of water

Bring water to boil in a large kettle, then add salt. Drop brussels sprouts into the rapidly boiling salted water. Bring to a boil again as rapidly as possible.

Boil slowly, uncovered, for 6-8 minutes, or until almost tender. Immediately remove with a skimmer and drain in a colander.

1 1/2 Tablespoons softened butter
1 1/2 quarts partially cooked brussels sprouts (prepared by following instructions above)
salt and pepper
2 to 4 tablespoons melted butter

Preheat overn to 350 degrees F. Smear butter inside the casserole dish. Arrange brussels sprouts heads up in the casserole dish. Sprinkle lightly with salt and pepper, and with the melted butter.

Cut a round of wax paper to the shape of the casserole dish, and lightly butter the paper. Lay the paper over the brussels sprouts. Cover and heat on top of stove until vegetables begin to sizzle, then place in the middle level of the preheated oven. Bake for about 20 minutes, or until the sprouts are tender and well impregnated with butter. Serve as soon as possible.