Monday, March 26, 2012

Irish Trinity Cake


My brother's birthday falls around Saint Patrick's Day, and every year we celebrate with a corned beef dinner. Traditionally, he has always asked for a marble cake with chocolate frosting, but this year I suggested something different.


I thought this cake would be a welcomed departure from tradition, because what's not to like? Guinness chocolate cake, Jameson tinted ganache filling, and Bailey's frosting: an Irish (holy) trinity. Forever, and even, amen.


This is a fantastically rich cake with bold flavor that is perfect for any Saint Patrick's Day celebration!


Irish Trinity Cake

Irish Trinity Cake

Source: Adjusted from Beantown Baker/Smitten Kitchen
Yield: One 3-layer 8" or 9" cake
Preparation time: 45 minutes
Cook time: 30 minutes
Total time: 3 hours


Ingredients
For the cake:
  • 2 cups Guinness
  • 2 cups unsalted butter (4 sticks)
  • 1 1/2 cups cocoa powder (dutch processed preferred)
  • 4 cups flour
  • 4 cups sugar
  • 1 tablespoon baking soda
  • 1 1/2 teaspoons salt
  • 4 eggs, at room temperature
  • 1 1/3 cups sour cream

  • For the ganache filling:
  • 16 ounces bittersweet chocolate
  • 1 1/3 cups heavy cream
  • 4 tablespoons butter
  • 1 tablespoon Irish whiskey (optional)

  • For the frosting:
  • 1 1/2 cups unsalted butter, at room temperature (3 sticks)
  • 1 1/2 pounds powdered sugar
  • 4 tablespoons Bailey's Irish cream (can subsitute milk or cream)
Instructions
For the cake:
  1. Preheat oven to 350°F. Prepare three 8" or 9" cake pans*. Bring Guinness and butter to simmer in heavy large saucepan over medium heat. Add cocoa powder and whisk until mixture is smooth. Cool slightly.
  2. Whisk flour, sugar, baking soda, and salt in large bowl to blend. Using electric mixer, beat eggs and sour cream in another large bowl to blend.
  3. Add Guinness-chocolate mixture to egg mixture and beat just to combine.
  4. Add flour mixture and beat briefly on slow speed. Using rubber spatula, fold batter until completely combined.
  5. Divide batter evenly among cake pans, filling about 2/3 of the way full.
  6. Bake cake until a toothpick inserted into center comes out clean, rotating them once front to back if your oven bakes unevenly, about 30 minutes. Cool cakes on a rack completely.
  7. For the ganache filling:
  8. Chop the chocolate and transfer it to a heatproof bowl. Heat the cream until simmering and pour it over the chocolate. Let it sit for one minute and then stir until smooth. Add the butter and whiskey and stir until combined.
  9. For the frosting:
  10. Whip the butter in the bowl of an electric mixer, or with a hand mixer, for several minutes. You want to get it very light and fluffy. Slowly add the powdered sugar.
  11. When the frosting looks thick enough to spread, drizzle in the Baileys (or milk) and whip it until combined. If this has made the frosting too thin (it shouldn’t, but just in case) beat in another spoonful or two of powdered sugar.
  12. Assembly:
  13. Level cake layers with a large serrated knife. Pipe a ring of frosting around the edge of the first layer to build a dam for the ganache. Spread a thick layer of ganache over the top of the layer.
  14. Repeat with second layer, then top the with the third cake layer.
  15. Frost outside of the cake with remaining frosting and decorate as desired.


*I only have two pans; you can bake 2 cakes, cool slightly and remove one from the pan, cool the pan and then bake the third.

Cakes can be baked one or two weeks in advance, and stored in the freezer, well wrapped. They do not need to be thawed before assembly, but the cake should then sit at room temperature for several hours before serving.

Sunday, March 4, 2012

Tostones (fried plantains) with Creamy Garlic Cilantro Dip for a Virtual Baby Shower

IMG_0013c
I am so excited to be bringing you this recipe today, because it was made for a very special friend, Krystal, from Mrs. Regueiro's Plate. Krystal is a fellow Gleek, and the inspiration behind my Glee Cupcakes series. Today, I'm participating in a virtual baby shower for Krystal, who is expecting her first little one (appropriately nicknamed "Cookie") with her husband, Eric, in just 2 short months! As a tribute to their heritage, all the recipes for this baby shower will be inspired by the Filipino or Cuban cultures. IMG_0018cI've been dying to make fried plantains, or tostones, since I discovered them during my brief stint at Columbia University. I spent one fabulous semester of graduate school up in Washington Heights, where a local restaurant, El Malecon, serves up the best chicken (and fried plantains) around. Krystal's baby shower finally gave me the occasion that I needed to take the plunge and try to make them at home. IMG_0005c

These crisp fried plantains are a treat in and of themselves, but when paired with a cool, tangy, creamy dip - they are out of this world!

Tostones (fried plantains) with Creamy Garlic Cilantro Dip
Tostones (friend plantains) with Creamy Garlic Cilantro DipSource: Adapted from GoodVeg
Yield: Serves 2-4 as appetizers
Preparation time: 15 minutes
Cook time: 20 minutes
Total time: 35 minutes
Ingredients
  • 2 green plantains
  • 1-4 cups canola or safflower oil
  • sea salt
  • 4-5 cloves roasted garlic
  • 1 cup sour cream or plain low fat greek yogurt
  • 1/2 cup fresh cilantro, roughly chopped
  • juice of one lime
  • 1 green onion, roughly chopped
  • pinch salt
  • pinch fresh cracked pepper

Instructions

  1. To make the garlic dip: Add roasted garlic, sour cream/greek yogurt, cilantro, green onions, and lime juice to a food processor or blender. Process until well blended. Add salt and pepper to taste. Chill until tostones are ready.
  2. To peel the plantains: Start by running a paring knife 3-4 times along the length of the plantain, only going deep enough to slice the thick skin. Peel away the skin of the plantains.
  3. Slice the plantains, on the bias, about 1/4 inch thick.  Place slices in a bowl of lightly salted water to prevent browning before cooking.
  4. Heat 1 to 4 cups oil (depending on the size of your cooking vessel) in a large pan over medium high heat (oil should reach 350-375 degrees F). Dry the plantains and carefully add to the hot oil, making sure not to crowd the pan. Fry the plantains 2-4 minutes on each side, then remove to a plate lined with paper towel.
  5. Carefully press the plantains between two sheets of wax paper, using a tortilla press, or the bottom of a large glass. Fry the smashed plantains another 1-2 minutes in the hot oil.
  6. Sprinkle with sea salt, and enjoy!


    Tuesday, February 14, 2012

    Valentine’s Pound Cake

    IMG_0010cc


    I'm mildly obsessed with baking a surprise shape into a cake or cupcakes. I can envision something for almost every occasion - shamrocks for St. Patrick's Day, bunnies for Easter, stars for the 4th of July (or Rachel Berry), pumpkins for Halloween, and of course, hearts for Valentine's Day. I am only limited by my horrible 3-dimensional carving skills or my supply of mini cookie cutters. Cupcakes are easy because you can use the cookie cutters to create your cake inserts, but baking into a cake takes more... artistic talent.

    IMG_0009cc

    A heart shape is relatively easy to carve free-hand, and since I chose pound cake as a medium, all I needed was one long piece of cake for carving. To make this cake, I first baked one pound cake with enough red food coloring to make it pink. I let it cool completely, and froze it to help make it stiffer for carving. Then I carved out the heart shape with a good knife. I prepared the batter for a second pound cake, and inserted the pink heart cake into the batter before putting it in the oven. Pound cake is supposed to rise a bit in the oven, so you might not be able to completely cover the pink heart cake with the batter for the second cake. Mine started out covered, but the batter melted down and evened out before starting to rise. In the end, some of the heart cake was poking out the top, but I almost preferred the look of that part of the cake, once sliced. I was very happy with the way it turned out, and it was a huge hit at the Valentine's Day Tea that I attended!IMG_0007cc

    This is a cute way to celebrate Valentine's Day. A classic pound cake with a heart baked in the middle, served with strawberries and whipped cream is sure to be a hit!

    Valentine's Pound Cake

    Valentine's Pound CakeSource: Baking Illustrated
    Yield: Serves 12
    Preparation time: 20 minutes
    Cook time: 70-80 minutes
    Total time: 1 hour, 30 minutes

    Ingredients

    • 16 tablespoons unsalted butter (2 sticks), softened but still cool
    • 1 1/3 cups sugar (9 1/3 ounces)
    • 3 large eggs, at room temperature
    • 3 large egg yolks, at room temperature
    • 1 1/2 teaspoons vanilla extract
    • 1 1/2 teaspoons water
    • 1/2 teaspoon salt
    • 1 1/2 cups plain cake flour (6 ounces) (note: Bridget recommends adding 1/2 teaspoon baking powder. I definitely would have done so if I'd see her post before making this.)

    Instructions

    1. Adjust an oven rack to the middle position and heat the oven to 325 degrees F. Grease a 9 by 5-inch loaf pan ( 7.5 cup capacity). Fit a sheet of foil or parchment paper lengthwise in the bottom of the greased pan, pushing it into the corners and up the sides. Fit a second sheet crosswise in the pan in the same manner.
    2. Beat the butter in the bowl of a standing mixer at medium-high speed until smooth and shiny, about 15 seconds. With the machine still on, sprinkle the sugar in slowly, taking about 30 seconds. Beat the mixture until light, fluffy, and almost white, 4 to 5 minutes, stopping the mixer once or twice to scrape down the sides of the bowl with a rubber spatula.
    3. Stir together the eggs, yolks, vanilla, and water in a 2-cup liquid measuring cup. With the mixer running at medium-high speed, add the egg mixture to the buter and sugar in a very slow, thin stream. Finally, beat in the salt.
    4. Place 1/2 cup flour in a sieve and sift it over the batter. Fold gently with a rubber spatula, scraping up from the bottom of the bowl, until the flour is incorporated. Repeat twice more, adding flour in 1/2-cup increments.
    5. Scrape the batter into the prepared pan, smoothing the top with a spatula or wooden spoon. Bake until a toothpick or thin skewer inserted into the crack running a long the top comes out clean, 70 to 80 minutes. (I found it did not take this long in my oven. 60 minutes was enough for mine, so check early!) Let the cake rest in the pan for 5 minutes, then invert onto a wire rack. Place a second wire rack on the cake bottom, then turn the cake top-side up. Cool to room temperature, remove and discard the foil, and serve. If not served immediately, wrap the cake in plastic, then in foil. Store the cake at room temperature.

      Friday, February 3, 2012

      Guacamole

      IMG_0181c

      Along with pico de gallo and fresh tomatillo salsa (which I hope to share someday!), this is another favorite recipe to come from my husband's family. It's so easy to throw together, and with avocados on sale for $1 each the past few weeks, we've been enjoying it every weekend. There are several schools of thought when it comes to what belongs in guacamole, but I definitely love the simplistic approach of this recipe from my husband's aunt, Ethel.

      Creamy avocados in harmony with lime and cilantro make this a perfect snack for your next party, or any day!

      Guacamole


      Guacamole

      Source: Tia Ethel
      Yield: About 2 cups
      Preparation time: 10 minutes


      Ingredients

      • 4 avocados
      • 2 limes
      • 3/4 cup fresh cilantro
      • 1/4 teaspoon garlic powder (optional)
      • pinch salt, to taste

      Instructions

      1. Add the flesh from the avocados to a large bowl or food processor. Set aside one or two of the pits; we'll add them back at the end to keep the guacamole from browning.
      2. Add juice of 2 limes, cilantro, garlic powder (if using), and a pinch of salt to the bowl.
      3. Blend with an immersion blender or process in the food processor, until well blended and no large pieces of avocado are visible.
      4. Check for taste; add more salt and blend again if needed. I like to taste the guacamole using the chips that it will be served with, since those are often salty on their own.
      5. Add reserved avocado pits and push them into the guacamole.  Serve immediately, or cover tightly with plastic wrap pressed against the guacamole and chill in the refrigerator until serving. (I prefer it slightly chilled, so I like to do this.)


        Tuesday, January 31, 2012

        Baked Buffalo Wings

        When I was first getting to know my (now) husband, I was relieved to discover there would never be a sports team rivalry in our house. The only sport he (mildly) cares for is football, and his favorite team is ::snicker:: the 49ers. I'm not a huge sports fan myself, but I'll watch baseball if the Red Sox are playing, football if the Patriots are playing, hockey if the Bruins are playing, and basketball if the Celtics are playing (maybe).

        I never dreamed we'd have such an interesting day in our house, as the day of the AFC/NFC championship games. I eagerly watched as much as I could of both games (working around our son's naps and bedtime). First - the Pats win. And down to the last few minutes, the 49ers could have pulled off a victory, too. I was a little sad at the loss, because that would have made for a really exciting Superbowl in our house!
        IMG_0139c
        I wanted to make buffalo wings for this day of football. I've used Alton's method/recipe before, but when I finally got around to trying that sauce, I was underwhelmed. So this time I went off in search of a new recipe, and this one caught my eye. I decided to give this new method a try, as well, as it looked a little easier and I liked the idea of baking the wings for a few minutes with the sauce on them.


        We loved this spicy and slightly sweet sauce for buffalo wings. These baked wings aren't as crisp as fried ones, but I actually prefer them! To turn up the heat, increase the cayenne in the coating, or spike the sauce with some Tabasco or other favorite hot sauce.


        Baked Buffalo Wings


        Baked Buffalo Wings
        Source: Slightly adapted from Lana's Cooking
        Yield: Serves 2-3
        Preparation time: 20 minutes
        Inactive time: 1 hour
        Cook time: 1 hour
        Total time: 2 hours, 20 minutes

        Ingredients

        • 3/4 cup flour
        • 1/2 teaspoon cayenne powder, or more to taste
        • 1/2 teaspoon garlic powder
        • 1 teaspoon salt, divided
        • 20 chicken drummettes
        • 1/4 cup butter, melted
        • 3/4 cup Frank's, or your favorite hot sauce
        • 2 tablespoons honey
        • 2 tablespoons soy sauce

        Instructions

        1. Prepare a large baking sheet by lining with foil. Spray a cooling rack generously with cooking spray and place in the baking sheet.
        2. Add flour, cayenne powder, garlic powder, and 1/2 teaspoon of salt to a large ziploc bag. Seal the bag and shake to mix ingredients together.
        3. Dry the drummettes well with paper towels, then toss in the ziploc bag until well coated, about 5 at a time. Shake off the excess flour and place on prepared rack.
        4. Place the wings in the refrigerator, uncovered, for at least one hour.
        5. Preheat the oven to 400 degrees.
        6. Bake wings for 25 minutes, turn each wing over, then bake an additional 25 minutes.
        7. Meanwhile, whisk together the melted butter, hot sauce, honey, soy sauce and remaining ½ teaspoon of salt in a small bowl.
        8. Remove the wings from the oven and dip them 3 or 4 at a time in the sauce mixture.
        9. Place the coated wings back on the pan, return the pan to the oven and cook for an additional 6-7 minutes.
        10. Remove from the oven, place on a serving dish and drizzle remaining sauce over wings.

          Friday, November 4, 2011

          Carrot Cake Comparison

          Today, I am honored to be recognized by a fellow food blogger, Jen of The Beantown Baker. She's included me in her (fabulous) Friday Favs series!  Hop on over to her blog to see the results of my carrot cake comparison!

          IMG_1179c

          Thursday, August 25, 2011

          Chipotle Salsa Turkey Burgers

          Whew! It's time to dust off the cobwebs around here. We've had a busy summer and I took some time to focus on my family, friends, and home. I'm excited to get back to blogging again, especially with fall just around the corner and a new season of Glee and Glee Cupcakes!

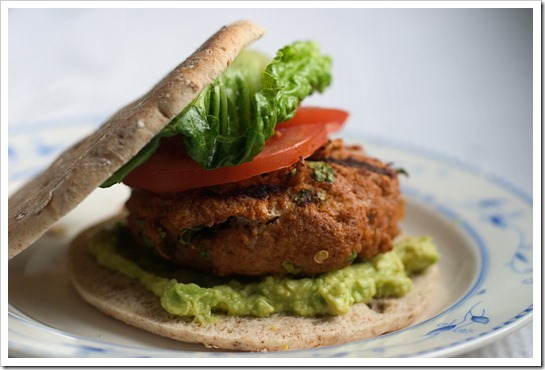
          Part of the reason for the slow down around here is that I wasn't really making new recipes. To keep things simple in the kitchen, I fell back on things I've made before and knew we loved. This recipe is one that I made many times over this summer. The inspiration came one day when there were a few odd ingredients in the fridge that needed to be used up. This is one of those recipes that, now, I can skip the recipe card and go based on memory - and I love that!

          CRW_0085c


          These turkey burgers are a great choice when you are looking for something different than your run-of-the-mill burgers. The chipotle and adobo sauce provide a great smokiness, and the red onion is bright punch of flavor. We love them!


          Chipotle Salsa Turkey Burgers


          Chipotle Salsa Turkey Burgers

          Yield: Serves 4
          Preparation time: 10 minutes
          Cook time: 15 minutes
          Total time: 25 minutes


          Ingredients

          • 1 pound ground turkey

          • 1 chipotle pepper with about 1 tablespoon adobo sauce

          • 1/3 cup salsa

          • 1/2 cup whole wheat breadcrumbs

          • 1/3 cup red onion, diced

          • 1/3 cup chopped fresh cilantro

          • juice from one large lime, divided

          • 2 teaspoons chili or taco seasoning

          • 1/2 an avocado

          • burger buns, lettuce, sliced tomato, cheese, and whatever else you like to put on burgers

          Instructions

          1. De-seed and mince the chipotle pepper.

          2. Add all ingredients except avocado and half of the lime juice to a large bowl.

          3. Mix gently just until thoroughly combined; do not over-work.

          4. Shape into four equal burgers. Grill over medium-high heat for 5-7 minutes per side, or until no longer pink in the center.

          5. Mix avocado and reserved half of the lime juice in a small bowl. Spread avocado mixture on burger bun. Build the burger with your favorite toppings, and enjoy!