Monday, October 22, 2012

Soft Pumpkin Oatmeal Cookies

The turn to autumn is one of my favorite things about living in New England. The air turns crisp, the leaves turn beautiful orange, yellow, and red hues, football starts up (go Pats!), and I can finally use the oven again without complaints that it's too hot. My husband's sweet tooth has suddenly come alive, as he has recently requested both caramel brownies and pumpkin chocolate chip cookies.
IMG_0042cc
Life has been a little crazy (evident by the tumbleweeds rolling through this blog), but I jumped at the chance to make cookies. They are usually pretty quick to throw together and would curb my yearning to get back to baking. I went straight to my blog to pull up the cookie recipe, only to discover it wasn't there. When I thought about it, I could barely remember ever having made pumpkin cookies before.

IMG_0049cc
I pulled up my trust excel spreadsheet of recipes, and right there was a recipe for soft pumpkin cookies, rated five stars - my highest rating. I'm not sure why I never blogged about them, but I'm so happy to have 'found' them again. I threw in a few tweaks and my usual substitutions, and the result was a soft, but sturdy, cookie that is perfect for fall!
Soft Pumpkin Oatmeal Cookies
Soft Pumpkin Oatmeal Cookies Source: Adapted from Joy the Baker and Big Fat Cookies
Yield: about 2 dozen cookies
 
 
Ingredients
  • 2 cups whole wheat pastry flour
  • 1 1/2 cups old fashioned oats
  • 1 1/2 teaspoons baking powder
  • 1 teaspoon soda
  • 1/2 teaspoon salt
  • 1 teaspoon ground cinnamon
  • 1/4 teaspoon freshly grated nutmeg
  • 1/4 teaspoon ground cloves
  • 1 1/4 cups evaporated cane juice
  • 1/2 cup (one stick) butter, at room temperature**
  • 2 eggs
  • 1 cup canned pumpkin
  • 1 teaspoon vanilla extract
  • 1 cup chocolate chips
  • 1/2 cup dried cranberries
**I actually make this with Earth Balance butter sticks and it worked well.
Instructions
  1. Preheat the oven to 325 degrees F. Line two baking sheets with parchment paper.
  2. Stir the flour, oats, baking powder, baking soda, salt and spices together in a medium bowl and set aside.
  3. In a large bowl, using an electric mixer on medium speed or a stand mixer fitted with a paddle attachment, cream together the butter and sugar until lightened in color, about 2 minutes. Scrape the sides of the bowl as needed during mixing. On low speed, mix in the eggs, one at a time. Add the pumpkin and vanilla, mixing just until blended. Slowly add the flour mixture to incorporate it. Mix in the chocolate chips and cranberries.
  4. Scoop mounds of dough, roughly 2 tablespoons each, onto lined sheets.  Space cookies at least 2 1/2 inches apart.
  5. Bake cookies about 14 minutes, until the edges are just lightly brown. Cool cookies on the baking sheet for 5 minutes before transfering to a wire rack to cool completely.  The cookies can be stored in a tightly covered container at room temperature for up to 4 days.

Wednesday, October 17, 2012

No-Bake Mint Brownies

Clean eating has changed my life in many ways, but one particular change was definitely unexpected. Growing up, I was never a huge fan of chocolate, and most certainly wanted nothing to do with dark chocolate. I viewed chocolate simply as a vehicle for delivery of other delicious things such as mint (my favorite) or peanut butter filling, almonds, raisins... you get the picture.
1brownieIMG_0089c525
As clean eating adjusted my taste buds, I came to have an appreciation for a nice high quality piece of dark chocolate. While it still wouldn't be the first thing I reach for, I do enjoy the smooth, velvety texture and deep, complex flavors. (Just don't ask me to eat cacao nibs. I'm not THAT appreciative yet!)
1brownieIMG_0093c525
Naturally, brownies were never something I would go nuts for, but when I stumbled on this recipe for no-bake mint brownies, I just had to try them. Clean dessert + mint + quick to prepare = a happy balanced baker who doesn't actually have to bake! I was so in love with these after making them, that I went out the next day for a jumbo bag of dates so I could make more. These brownies are super dense and fudgy, and I love the little crunch from the bits of walnut.

 I found that the amounts in the original recipe didn't fill an 8x8 pan without being paper thin, so I scaled up the whole recipe to yield a decent sized brownie.
No-Bake Mint Brownies
No-Bake Mint Brownies Source: Adapted from Chocolate Covered Katie via Eva Bakes
Yield: 16 brownies


Ingredients
  • 2 cups walnuts 
  • 2 and 1/2 cups pitted dates (make sure to use whole, not chopped dates) 
  • 2 tsps vanilla extract 
  • ½ cup cocoa powder 
  • 10 drops of pure peppermint extract (you can add more or less if you like, I felt like this was a good middle-of-the-road amount) 
  • Chocolate chips or cacao nibs (optional) 
  • Dash of salt (optional but recommended)
Instructions
  1. Combine all ingredients, using a food processor or blender. Press evenly into an 8x8 inch pan. Chill in the refrigerator for at least 30 min to help firm up the brownies for slicing. Slice into 16 squares and serve. I stored these in the refrigerator because I liked them chilled!

Thursday, October 11, 2012

Spiced Chicken Stir-fry with Ginger, Cilantro, and Lime

Stir-fry dinners are wonderful to have in your arsenal. They can be made quickly, and, if you ask me, are downright delicious for something that takes such  minimal effort. We've made other stir-fries before, but variation is key in our house so I'm always willing to try something new. IMG_0011c
This version was an easy choice because most of these ingredients are ones that I always have on hand - ginger is kept in the freezer wrapped in foil, scallions are chopped and bagged and kept in the freezer, and limes and cilantro are standby ingredients in our fridge.  Mirin, however, is something I don't keep on hand since I have trouble finding it.  I substituted some dry sherry cooking wine in place of the mirin and it worked well. We loved this dish for the depth of flavor and how quickly it came together.
Spiced Chicken Stir-fry with Ginger, Cilantro, and Lime
Spiced Chicken Stir-fry with Ginger, Cilantro, and Lime Source: Slightly adapted from Mary Ellen's Cooking Creations
Yield: Serves 2


 Ingredients
  • 2 chicken breasts, sliced into 2-bite pieces
  • Spices: 1 tbsp ground cumin, 1 tbsp dried red pepper flakes, 1 tsp ground black pepper, 1/2 tsp sea salt, 1 tsp chili powder, 1/4 tsp cayenne pepper
  • Juice of 1/2 of a lime
  • 1 tbsp olive oil
  • 3 cloves garlic, minced
  • 1 tsp freshly grated ginger
  • 1 tbsp soy sauce
  • 1 tsp mirin
  • 1/2 cup chicken broth 
  • small head of broccoli, chopped into bite-sized pieces
  • 2 scallions, chopped
  • Handful of cilantro, roughly chopped
  • cooked brown rice, for serving
Instructions
  1. Toss chicken with the spices and half of the lime juice.
  2. Heat olive oil in a large saute pan or wok over high heat.
  3. Add the chicken and stir fry until almost cooked through.
  4. Lower the heat to medium high and add the garlic and ginger; saute 1 minute.
  5. Add broccoli, soy sauce, mirin, chicken broth, and the rest of the lime juice.  Bring to a low simmer, cooking until the broccoli is crisp-tender.
  6. Remove from heat and stir in the scallions and cilantro.  Serve over brown rice.

Tuesday, September 4, 2012

Frozen Berry Delight

IMG_0085cc

I feel fortunate to live in New England where we have four distinct seasons. Winter is my favorite, by far, because I adore snow. Even if I have to drive through it.

Culinarily speaking (I think I just made up a word), there’s something to look forward to with each changing season. By the time one season ends, I’m tired of making whatever it was that was appealing a few months earlier. With September upon us, I’m getting all warm and fuzzy at the prospect of baking and cooking with pumpkin, making huge batches of chili, my favorite McIntosh apples, pumpkin beer, and – of course – Patriot’s football. I’m totally over salads topped with grilled chicken, burgers, and loads of zucchini-anything to use up the abundant harvest.

There is one thing that I am always sad to say goodbye to in the fall, and that’s frozen drinks. Of course I could enjoy them year round, but they are most enjoyable on a warm summer afternoon or evening. One day this summer, I just started throwing things into the blender, and ended up with quite a refreshing beverage! Here is one more to enjoy while the final days of summer still linger.

Frozen Berry Delight

Serves: 1


Ingredients:

  • 1 (6 oz) cup lemon italian ice
  • 1 cup frozen berries
  • 1/2 cup strawberry ice cream
  • 1 cup fruit juice (I used cranberry juice, but it’s up to you!)

Directions:

Combine all ingredients in a blender. Let sit about 5 minutes soften the berries and italian ice for easier blending. Blend until smooth, serve immediately. If you have a Vitamix, A) I’m jealous and B) you can probably skip the 5 min wait.

Wednesday, July 18, 2012

Whole Wheat Frosted Zucchini Brownies

We didn't plant a garden this year because I knew I simply wouldn't have time to tend to it. I really love fresh veggies from the garden, but even without my own, I wouldn't be out of luck this summer. My dad is a habitual over-planter. There are always plenty of extra zucchini, tomatoes, green beans, etc to go around when he starts harvesting. This year is no exception, and his zucchini are beautiful and ready for picking. On a visit last weekend, my parents brought me four zucchini, and as soon as I saw this recipe, I knew exactly what I'd be doing with two of them!
IMG_0047cc
Nicole already made one adjustment that I normally do in baking, which is to replace all-purpose flour with whole wheat pastry flour. I took it a step further and used my favorite sugar adjustment - evaporated cane juice. I loved her suggestion of using applesauce instead of oil, but decided to go for the glory on the first try, and use that one later if I make them again. I reduced the sugar to 1 cup, as she suggested, but after a quick sampling of the final batter, decided that was too little and added 1/4 cup more. It was definitely an interesting batter to work with, and they turned out to sort of be a cross between cake and brownie. No matter what you call them, though, they certainly are delicious!
IMG_0040cc
These brownies are well on their way to being a great dessert for clean eaters, and it almost pained me to pour the full-of-powdered-sugar frosting on top. The frosting is quite sweet and is a fabulous complement to the brownies, but I was hoping for something a little more healthy. The good news is that I might have just the right frosting recipe! It's been waiting on the sidelines, for just the right companion to come along. I will definitely be making these brownies again to test out this (hopefully) great match!

Whole Wheat Frosted Zucchini Brownies
Whole Wheat Frosted Zucchini BrowniesSource: Slightly adapted from Prevention RD
Yield: 30 brownies


Ingredients

For the brownies:
  • 1/2 cup safflower or canola oil
  • 1 1/4 cups evaporated cane juice
  • 2 tsp vanilla extract
  • 2 cups whole wheat pastry flour
  • 1/2 cup (dutch processed, if available) unsweetened cocoa powder
  • 1 1/2 tsp baking soda
  • 1 tsp salt
  • 2 cups zucchini, shredded (about 2 zucchini)
For the frosting:
  • 6 Tbsp unsweetened cocoa powder
  • 1/4 cup (1/2 stick) unsalted butter
  • 2 cups powdered sugar
  • 1/2 cup nonfat milk
  • 1/2 tsp vanilla extract

Directions
  1. Pre-heat oven to 350 F. Grease and flour a 9×13 inch baking dish, or line with parchment.
  2. In a large bowl mix together oil, sugar and 2 teaspoons of vanilla extract until well blended. In another bowl combine the flour, 1/2 cup cocoa powder, baking soda and salt. A little at a time stir into the sugar mixture. Fold in zucchini. Note: the batter will be dry and crumbly. Spread the mixture evenly into the prepared baking dish.
  3. Bake for 25-30 minutes until the brownies spring back when gently touched. Remove from the oven and allow them to cool.
  4. To make the frosting, melt together the cocoa powder and butter in a small sauce pan over low heat. Set aside to cool. In a medium bowl blend confectioner’s sugar, milk, and 1/2 teaspoon vanilla extract. Stir in the butter/cocoa mixture. Spread over cooled brownies and cut into squares. Refrigerate 1-2 hours to set.

Monday, July 16, 2012

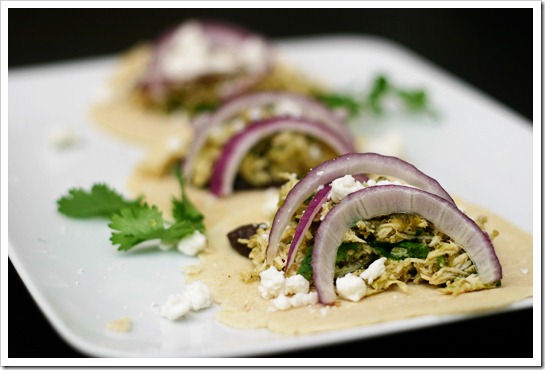
Salsa Verde Crockpot Chicken Tacos

Since my last 6 posts have been decadent desserts, I guess it's time to give you a delicious, clean, easy meal to get back on track. IMG_0002cThis is another great recipe where you let the crockpot do most of the work. Slow cooking the chicken with tomatillo salsa gives it great flavor without drying it out. I chose to make my own salsa verde and corn tortillas, but you can also use store bought to make this dish even easier.

We loved the combination of flavors here - bright red onion, creamy cojita cheese, earthy black beans, and of course the wonderful salsa verde. It's a new favorite of ours!
Salsa Verde Crockpot Chicken Tacos
Salsa Verde Crockpot Chicken TacosSource: Slightly adapted from The Novice Chef
Yield: 4 servings


Ingredients:
  • 2 pounds chicken breasts
  • 3 cups medium salsa verde, divided (recipe follows)
  • 1 1/2 cups chicken broth
  • 1 teaspoon garlic salt
  • 1/2 cup chopped fresh cilantro
For the tacos
  • 8-10 corn tortillas
  • 1 can black beans
  • 1 jalapeno, stem removed (remove seeds if you don't like the heat)
  • 1 small red onion, sliced
  • 1/2 cup crumbled cotija cheese
  • lime, for squeezing on top
Directions:
  1. Whisk together 1 cup salsa verde, chicken broth and garlic salt in crockpot. Add chicken breasts and cook for 4 hours on high or 8 hours on low.
  2. Combine black beans (do not rinse/drain) and jalapeno in a small sauce pan. Heat on medium-low until beans are cooked and pepper has softened, about 8-10 minuted. Puree in a food processor or blender.
  3. Remove chicken from crockpot and discard remaining liquid. Shred chicken with two forks and place in a medium bowl. (You can also shred chicken by beating on low spead in a stand mixer for about 30 seconds - works great and is very quick!) Add remaining 2 cups salsa verde and chopped cilantro to chicken. Mix to combine.
  4. Fill tortillas with a scoop of black beans, a scoop of chicken, a few slices of red onion, a healthy scoop of crumbled cotija cheese and a squeeze of lime!

Roasted Tomatillo Salsa
Source: slightly adapted from Rick Bayless
Yield: about 3 cups

Ingredients:
  • 1 1/2 pounds (12 medium) tomatillos, husked and rinsed
  • Fresh hot green chiles to taste (3 serranos or 3 jalapenos), stemmed
  • 6 large garlic cloves, peeled
  • 1 cup fresh cilantro (thick bottom stems cut off), roughly chopped
  • 3/4 cup water
  • 3/4 small white onion, finely chopped
  • Salt
Directions:
Roast the tomatillos, chile(s) and garlic on a rimmed baking sheet 4 inches below a very hot broiler, until blotchy black and softening (they’ll be turning from lime green to olive), about 5 minutes. Flip them over and roast the other side. Cool, then transfer everything to a blender, including all the delicious juice the tomatillos have exuded during roasting. Add the cilantro and water, then blend to a coarse puree. Scoop into a serving dish. Rinse the onion under cold water, then shake to remove excess moisture. Stir into the salsa and season with salt, usually 1 teaspoon.

Monday, July 9, 2012

Reese's Cheesecake Brownie Bites

IMG_0030c
The dessert gods where smiling down on my husband the day this recipe graced my computer screen. He's not much of a sweets guy, but he does love peanut butter cups, cheesecake, and brownies. What would be more perfect for him, than one dessert that combines all three? I couldn't wait to make it, and neither could he!
IMG_0020c
There's a lot to love here - chewy, fudgy brownie topped with rich, peanut buttery cheesecake, decorated with drizzled chocolate and Reese's Pieces. It's a decadent dessert that we just can't resist!
Reese’s Cheesecake Brownie Bites
Reese’s Cheesecake Brownie Bites Source: Slightly adapted from Bru Crew Life via So Tasty, So Yummy, brownie recipe from Baking Illustrated, from the Editors of Cook's Illustrated
Yield: about 20 cheesecake brownie bites


Ingredients:
For the brownie layer
  • 5 ounces semisweet or bittersweet chocolate, chopped
  • 2 ounces unsweetened chocolate, chopped
  • 8 tablespoons unsalted butter (1 stick) cut into quarters
  • 3 tablespoons cocoa powder
  • 3 large eggs
  • 1 1/4 cups sugar
  • 2 teaspoons vanilla extract
  • 1/2 teaspoon salt
  • 1 cup all-purpose flour

For the cheesecake layer
  • 16 Reese’s peanut butter cups
  • 1 package (8 ounces) cream cheese
  • 2 tablespoons butter, softened
  • 1 can (14 ounces) sweetened condensed milk
  • 1 tablespoon cornstarch
  • 1 egg
  • 1 teaspoon vanilla

For decorating
  • 2 ounces chocolate chips, melted
  • 2 bags of Reese’s Pieces

Directions
  1. Place the peanut butter cups in the freezer for 30 minutes. Preheat oven to 350 degrees. Line two muffin tins with paper liners.

  2. In medium heatproof bowl set over a pan of almost-simmering water, melt chocolates and butter, stirring occasionally until mixture is smooth. Whisk in cocoa until smooth. Set aside to cool slightly.

  3. Whisk together eggs, sugar, vanilla, and salt in medium bowl until combined, about 15 seconds. Whisk warm chocolate mixture into egg mixture; then stir in flour with wooden spoon until just combined. Divide brownie batter evenly between lined muffin tin cups.

  4. Beat cream cheese, butter and cornstarch in a medium bowl until fluffy. Beat in milk, egg, and vanilla until smooth. Chop up the peanut butter cups and stir into the cream cheese mixture. Spoon the cream cheese mixture over top of the brownie batter. Bake 25-30 minutes. Cool completely.

  5. Drizzle with melted chocolate and sprinkle Reese’s Pieces on top. Keep refrigerated until ready to eat.